Wifi and Ethernet dropout problems in raspberry pi


Hi Everyone

More work to do! But i also need to write the post i promised. So on Business!

The thing i am writing about today is what freaked me out for many days. Didn’t know what was happening to my r-pi. So that ways its very valuable post which can save lot of your time that i spent tackling these errors. Two main problems were Wi fi + Ethernet drop outs –

Wi fi drop out problem –

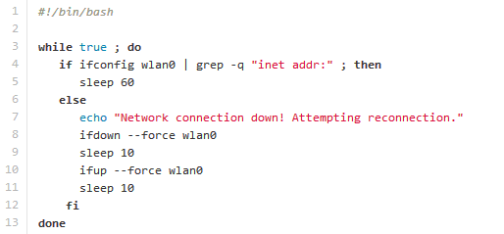
One problem that I came across almost first hour I started using raspberry pi was its wi fi connection drops out every now and then and didn’t reconnect automatically until I reboot r-pi or run some command to do it manually( forcing wlan to reconnect). So I wrote a script to do this automatically.

It checks every minute for wireless connection and if I find it down then force it reconnect. See below –

Image

You can also find it here.

Ethernet Driver Problem –

Other problem that freaked me out was – my raspberry pi was freezing every 3 days while running continuously and after reboot it ran 3 more days but then again similar problem. These days I was using wi fi adapter to send data over wi fi network. So I decided to reboot my r-pi every day automatically. But then over Ethernet connection this freeze was happening more frequently (as fast as 4-5 hrs). so I decided to look for this in /var/syslog.

Surprise was – r-pi was not freezing. Heard that? Its USB and other ports were freezing (stopped working). May be that Ethernet problem was hard to tackle for kernel, causing it to freeze!  And the technical reason was –

“FIQ interrupt not triggering IRQ interrupt causing USB to dropout”

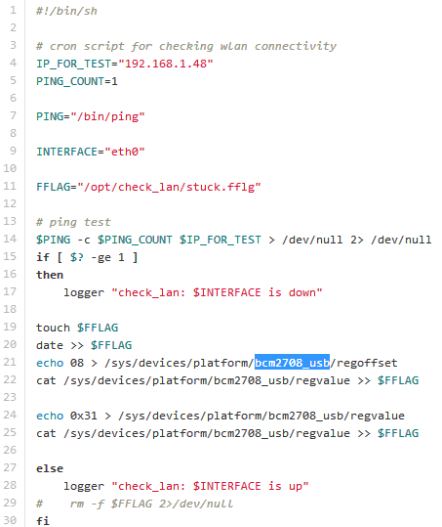
This comes into play when you run r-pi for longer periods. The problem was “wrong regoffset, value” in –

/sys/devices/platform/bcm2708_usb/regoffset
/sys/devices/platform/bcm2708_usb/regvalue

The solution is in this script –

Image

You can also find it here.

It pings to check if Ethernet is up and then its down then write correct regoffset /values in corresponding files.

These two problems cost me lot of time. I hope this will not be in your case.

I am still clueless about what to write in next post. May be you can propose some of ideas. I will be happy to get them.

Till then Stay Tuned – Stay Connected 🙂  Will write soon 🙂

Don’t forget to give your comments / feedback.
Connect your raspberry pi to Wi-Fi network (Command Line)


Hi Everyone,

Was messed up with work,  so couldn’t  post last 2 days. Better late than never.  Today I am covering how to connect to wi-fi network using command line(raspberry pi). So have a look –

Step 1 – 

Leave your wi-fi adapter placed on table. No need to connect it for now and open Linux terminal by clicking on its icon.

Step 2 –

Write following command and press ENTER –

sudo nano /etc/network/interfaces

Step 3 –

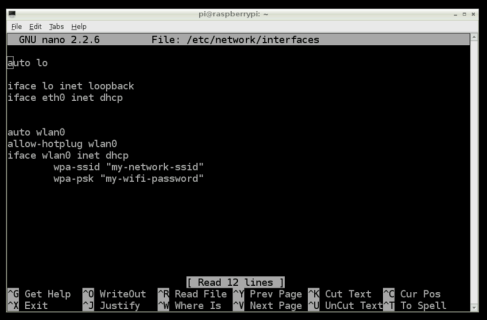
Editor window will open  –

Image

Step 4 –

Change text in quotes against  ‘wpa-ssid’  option with your SSID (wi-fi network name) and text against ‘wpa-psk’ option with your wi-fi network password(security key).

Step 5 –

To save this file press CTRL+O and then press ENTER

Step 6 –

Shut down your raspberry pi, plug wi-fi adapter in USB port and Restart it. Your raspberry pi will automatically get connected to your wi-fi network.

Tomorrow i will be covering some wi-fi and ethernet issues of raspberry pi as promised in my previous post. Till then – Stay Tuned – Stay Connected 🙂

And please don’t forget to give your comments and feedback. I am quite hungry of them.

Starting your raspberry pi for first time


First connect all the devices to your raspberry pi. (For device list refer to previous post)

If you have connected all these Devices and ready to run your r-pi for the first time, then congratulations to you. Lets just forget about OS thing and one thing you should do straight forward is Expanding your SD Card. Reason behind this is that when you loaded image of OS in SD card, originally it is loaded into 2 GB space from your whole SD Card. Other 6 GB (rest of space)  is inaccessible. Lets just make that 6 GB useful.

Enough, Now we are ready to start our r-pi for the first time. But one thing we still need to care about is –
“What option we have chosen for accessing r-pi?”

CASE 1  (SSH) –

In case of SSH option you can use some tools like putty or chrome app called Secure Shell (that i am using).

secureshell

As you can see we need IP address of raspberry pi in case of ssh that you can see in router log in  “Attached Devices” list and port will be 22 for ssh log in.

CASE 2 (Monitor) –

In case  you are using monitor you can directly attach your keyboard in USB port.

Log in-

By default raspbian has –

Username – pi

Password – raspberry

Raspi-Config

When you are going to start your raspberry pi for the first time we have to do some initial configurations. To do write command in shell prompt –

 $     sudo raspi_config

If you are using monitor then it will automatically appear.

Pop up that will appear will be

raspi-config

Now select expand_rootfs and click on yes option for reboot. You can also change locale settings if needed.

After first reboot we have expanded our raspbian os to full space in SD Card and we are ready to do what ever we want to do on it. So Congrats 🙂

Connecting to wi-fi

One more thing we often want to do is to connect our raspberry pi to wi-fi using wi-fi dongle (Netgear is fine) which is an added advantage of using r-pi rather than any other device (aurdino’s) for automation processes.

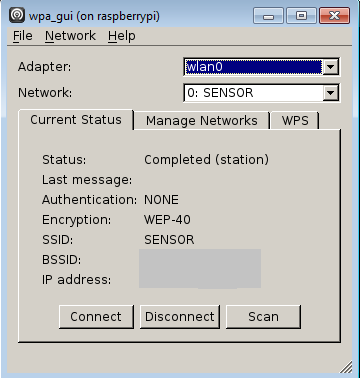
To add in GUI mode type “startx” if using monitor and double click on “wpa_gui” icon from desktop.  Pop will appear –

wpa

  1. Click on “Scan”.
  2. Select appropriate network and type its credentials and click OK.
  3. Click Connect / Disconnect for connecting/disconnecting to some network.

In next post i will explain how to connect with wi-fi using command line.

Also there are couple of problems that can come your way using wifi / ethernet connections and i will explain fixes for those problems in my next post.

So Stay Tuned 🙂 and don’t forget to comment and give your feedback.

Below you can download PDF about my first two posts – 

STEP BY STEP GUIDE -r-pi-signed

STEP BY STEP GUIDE (RASPBERRY PI)


STEP BY STEP GUIDE (RASPBERRY PI) 

Hi Every One,

This is my first post on wordpress and i have decided to start with a new and cool device that i encountered with. It is Raspberry pi.

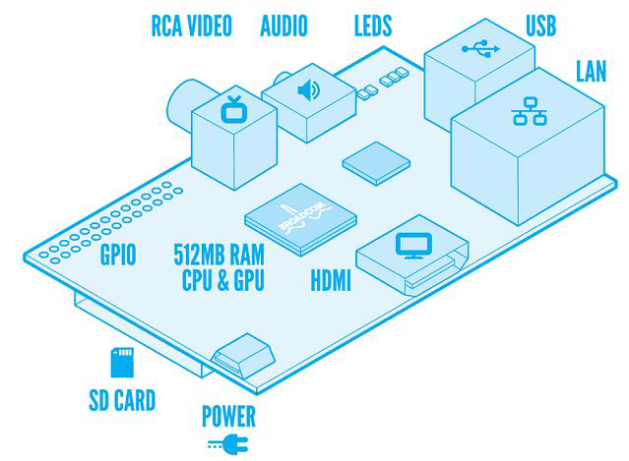
The Raspberry Pi is a credit-card-sized single-board computer developed in the UK by the Raspberry Pi Foundation with the intention of promoting the teaching of basic computer science in schools. We will be talking about Raspberry Pi (Model B) here. So have a look ->

Image

Now I will discuss how to start this for the first time. So Good Luck –

What you need?

  • Raspberry pi
  • SD card (8 GB Preferable)
  • A power adapter with micro USB male at the end ([700mA -2 A], 5 Volts) (Samsung charger will do)

There are many ways you can connect your raspberry pi for graphics. One is to connect with your
monitor. If you are going to connect it with monitor, you have 3 options –

  1. HDMI – HDMI (male) cable ( in case you have monitor with HDMI port)
  2.  AV cable(if you want to connect it to AV input of monitor/TV)
  3. HDMI – VGA convertor ( If you have VGA port at your monitor end)

Above things are nice to start with but you may also need to explore some additional options if you are going to attach more than 2 USB devices. Well in that case you need-

  • A USB hub with external power (you can rather use a normal USB hub but then you will face some problem because your raspberry pi is not going to supply that much power for attached devices to work).
  • If you don’t want to use any monitor, another way around is login through SSH (Secure Socket Shell). You can connect to your r-pi through SSH using Wi-Fi adapter with your r-pi. So this way you also need a Wi-Fi adapter. You can also connect your device to network using Ethernet Option. But then, in any case you also need to use monitor for first time to connect your r-pi with appropriate Wi-Fi network.

We only need above devices other than devices (e.g. Keyboard, Mouse, Wi-Fi device etc.) that you want to connect with your r-pi. Now if we are done with our purchase list, Next step is to connect these devices and worry about our software list.

Connect them all!

Before connecting them all and trying to run, we have to do one more thing – Installing a suitable operating system (OS) in SD Card. Well in case of r-pi we have many options available. My bet is on “Raspbian Wheezy”. You can find it @ RaspbianWheezyLink

Default login –
Username – pi Password – raspberry

Now as you have downloaded OS image file, you need to extract it and install it on r-pi. For installing you need a tool called Win32DiskImager (for Windows platform). You can download it @ Win32DiskImagerLink

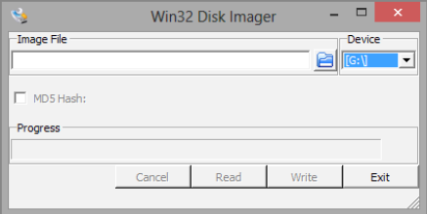
After installing above software just put your SD Card in laptop SD port and run this software. You will see a screen –

Image

  1. Select your SD card drive from dropdown at upper-right corner.
  2. Click on folder icon which is just left to it and browse to your OS image location & select it.
  3. Click on Write button at the bottom. In few minutes you will get OS image written on SD card.

Now it is time connect all the above devices. We will be starting our r-pi in next post.

As this is my first post i will be happy to get your feedback and i will motivate you to do so.

Next post will be soon as content is ready and i get feedback from this one.

Thanks all for bearing with me.

image courtesy – http://www.raspberrypi.org

ref – http://www.wikipedia.org