Static IP with Raspbian Jessie – A lot have changed!


Hi Everyone!

It has been a long time since i posted something here. Many people have posted about raspberry pi problems and features so I didn’t need to do the same. A lot have changed with r-pi with model 2 and now model 3. I hope the model 3 will put to end a lot of WiFi issues. The reason i am posting now is some of my old code stopped working with new Jessie release. Actually it didn’t stopped working. It just started working weirdly. One of the thing was with static IP.

Earlier static IP was provided in /etc/network/interfaces file. But Jessie comes with dhcpcd so interfaces file is only partially used now. Instead you have to provide static IP in /etc/dhcpcd.conf file from now on.

Let’s say we need to provide wlan0 with an static IP address. /etc/network/interfaces file will be like this –

auto lo
iface lo inet loopback
iface eth0 inet dhcp

allow-hotplug wlan0
auto wlan0
iface wlan0 inet manual

pre-up wpa_supplicant -B w -D wext -i wlan0 -c /etc/wpa_supplicant/wpa_supplicant.conf
post-down killall -q wpa_supplicant

Your /etc/wpa_supplicant/wpa_supplicant.conf  file will be like this –

ctrl_interface=DIR=/var/run/wpa_supplicant GROUP=netdev
update_config=1

network={
        ssid="WifiSSID"
        psk="password"
        key_mgmt=WPA-PSK
	id_str="home"
}

A your /etc/dhcpcd.conf file will be like this –

interface wlan0 
static ip_address=192.168.1.2/24 
static routers=192.168.1.1 
static domain_name_servers=8.8.8.8 8.8.4.4

Elastix – VoIP for your Raspberry Pi (How to install?)


Hi Everyone

Today i am going to tell you about something very cool. I am gonna tell you about a tool for VOIP services on none other than “Raspberry Pi”. I am gonna explain “Where can you get it? and How to install?” So, Lets do it.

Elastix –  the open-source unified communications outfit can be downloaded from here.

How to install?

  • You need a SD Card of atleast 4 GB.
  • Uncompress  uElastix((elastix_arm) tarball file. You will see “BOOT.tar.gz” and “rootfs.tar.gz” files.
  • Now you have to do partitioning of your SD Card in to two drives with “BOOT” and “rootfs” names.
    • The first partition named “BOOT” should be FAT type and partition size should be at least 16 MB.
    • The second partition named “rootfs” should be EXT3 type with remaining disk size.
    • Use any partition tool for doing these partitions.
  • Mount both partitions and uncompress the files with the following commands:
    • tar -C /media/BOOT/ -xzf BOOT.tar.gz
    • tar -C /media/rootfs/ -xzf rootfs.tar.gz
  • The other thing you need to check is if files are directly uncompressed into “Boot” and “rootfs” directories or in corresponding folders in these directories. If files are in folders named “BOOT” and “rootfs” then you have to move them outside of these folders.
  • Now you can unmount your partitions and put SD Card in r-pi.
  • Login Details – user “admin” and password “palosanto”. This was mine. You can check yours in instructions file comes with package.

More about Elastix – 

Asterisk works in middle of whole package. In image below you can come to know about certain features of this package. I will explain more about it in my next post.

asrisk

Till then, Good Bye and don’t forget to comment.

Image courtesy – http://www.raspberrypi.org

Programming over SSH in Raspberry pi (r-pi) and Introducing Adafruit Web IDE


Raspberry Pi Spot

Hi Everyone

Its have been few days that i haven’t posted something. Today i am going to explain how to start writing programs in raspberry pi over SSH (Secure Socket Shell). So cope with me 😉

Lets start with some basics –

Which Programming Language?

Raspberry pi officially comes with “Python” as a major programming language. It comes with python IDE which is known as “IDLE3”.  Well we are talking about programming over SSH, so forget about it.

Programming?

For writing a program in Raspberry pi or in any other system you first need an editor. If you are running “Raspbian Wheezy” on your r-pi, you have various options available (vi, nano etc).

You will find “vi” hard to understand and in case of nano (writing program in Python), you have to cope with indentation problem. So what to use?

Forget it for just now. We will be writing a…

View original post 603 more words

Hosting PHP website on Raspberry pi web server – Complete guide


Raspberry Pi Spot

Hi Everyone

Today I am going to write about how to make your r-pi a web server and host your website on raspberry pi.

Choosing a web server –

First we need to choose a web server that should run on your raspberry pi. My bet is on Lighttpd.

Lighttpd?

“Security, speed, compliance, and flexibility — all of these describe lighttpd” – That’s what its developers say about it. Actually it includes many interesting features like FastCGI, SCGI, Auth, Output-Compression, URL-Rewriting etc and that too implemented with a small memory footprint and good CPU Load management. So you need not to worry about your r-pi resources much.

Installing Lighttpd !

sudo apt-get -y install lighttpd

Choosing your website platform –

You need to select a website platform that your website will be in. In my case it is php. So i need to install PHP for this.

PHP Install –

Don’t…

View original post 167 more words

Hosting PHP website on Raspberry pi web server – Complete guide


Hi Everyone

Today I am going to write about how to make your r-pi a web server and host your website on raspberry pi.

Choosing a web server –

First we need to choose a web server that should run on your raspberry pi. My bet is on Lighttpd.

Lighttpd?

“Security, speed, compliance, and flexibility — all of these describe lighttpd” – That’s what its developers say about it. Actually it includes many interesting features like FastCGI, SCGI, Auth, Output-Compression, URL-Rewriting etc and that too implemented with a small memory footprint and good CPU Load management. So you need not to worry about your r-pi resources much.

Installing Lighttpd !

sudo apt-get -y install lighttpd

Choosing your website platform –

You need to select a website platform that your website will be in. In my case it is php. So i need to install PHP for this.

PHP Install –

Don’t change the order below –

sudo apt-get -y install php5-common php5-cgi php5

Enable fastcgi module by

sudo lighty-enable-mod fastcgi-php

Restart Lighttpg services

sudo service lighttpd force-reload

Give Permissions – 

“/var/www” directory is currently owned by root. So let’s make the “www-data” user and make it owner of this dir.

sudo chown www-data:www-data /var/www

We also need to give it write permissions.

sudo chmod 775 /var/www

Adding user “pi” to “www-data” group

sudo usermod -a -G www-data pi

Reboot raspberry-pi(r-pi) for these changes to take effect.

sudo shutdown -r now

Loading files in your browser –

Go in your browser and type IP Address of you r-pi. You will see default page loaded there which is in /var/www directory. You can put your index.html and all other files there that you want to host using ftp or something else.

That’s done for now. We will look in to this more in next post. Till then you drop your queries / comments / feedback.

Stay Tuned 😛 Stay Connected 😛


Wifi and Ethernet dropout problems in raspberry pi


I think its quite useful. Watch it.

Raspberry Pi Spot

Hi Everyone

More work to do! But i also need to write the post i promised. So on Business!

The thing i am writing about today is what freaked me out for many days. Didn’t know what was happening to my r-pi. So that ways its very valuable post which can save lot of your time that i spent tackling these errors. Two main problems were Wi fi + Ethernet drop outs –

Wi fi drop out problem –

One problem that I came across almost first hour I started using raspberry pi was its wi fi connection drops out every now and then and didn’t reconnect automatically until I reboot r-pi or run some command to do it manually( forcing wlan to reconnect). So I wrote a script to do this automatically.

It checks every minute for wireless connection and if I find it down then force it reconnect. See below…

View original post 256 more words

STEP BY STEP GUIDE (RASPBERRY PI)


Here is step by step guide to raspberry pi and few other posts to read.

Raspberry Pi Spot

STEP BY STEP GUIDE (RASPBERRY PI) 

Hi Every One,

This is my first post on wordpress and i have decided to start with a new and cool device that i encountered with. It is Raspberry pi.

The Raspberry Pi is a credit-card-sized single-board computer developed in the UK by the Raspberry Pi Foundation with the intention of promoting the teaching of basic computer science in schools. We will be talking about Raspberry Pi (Model B) here. So have a look ->

Image

Now I will discuss how to start this for the first time. So Good Luck –

What you need?

  • Raspberry pi
  • SD card (8 GB Preferable)
  • A power adapter with micro USB male at the end ([700mA -2 A], 5 Volts) (Samsung charger will do)

There are many ways you can connect your raspberry pi for graphics. One is to connect with your
monitor. If you are going to connect it…

View original post 458 more words

Programming over SSH in Raspberry pi (r-pi) and Introducing Adafruit Web IDE


Hi Everyone

Its have been few days that i haven’t posted something. Today i am going to explain how to start writing programs in raspberry pi over SSH (Secure Socket Shell). So cope with me 😉

Lets start with some basics –

Which Programming Language?

Raspberry pi officially comes with “Python” as a major programming language. It comes with python IDE which is known as “IDLE3”.  Well we are talking about programming over SSH, so forget about it.

Programming?

For writing a program in Raspberry pi or in any other system you first need an editor. If you are running “Raspbian Wheezy” on your r-pi, you have various options available (vi, nano etc).

You will find “vi” hard to understand and in case of nano (writing program in Python), you have to cope with indentation problem. So what to use?

Forget it for just now. We will be writing a python program in nano. So first we have to be logged in to our r-pi over SSH. We may use Chrome’s “Secure Shell” or “Putty” for our desktop. You can find link’s as follows –

Putty Link   &   Secure Shell Link (for Chrome)

So download it and run, you will find something like this –

Image

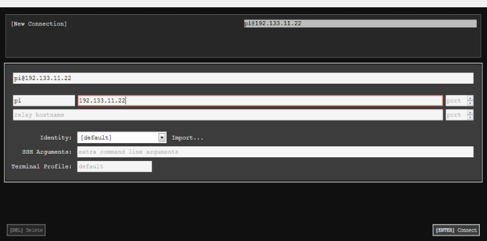
Type username (pi) and IP (your raspberry ip address) and port (22 : default) and press ENTER. It will ask for password (“raspberry” – default). Type it and you have now successfully logged in.

Write a program!

Now its time to write a program. Lets say I want to write a program named “hello_world.py”. So type at your terminal –

$  sudo nano hello_world.py

It will write an empty file in your current working directory named “hello_world.py” and will open a window –

Image

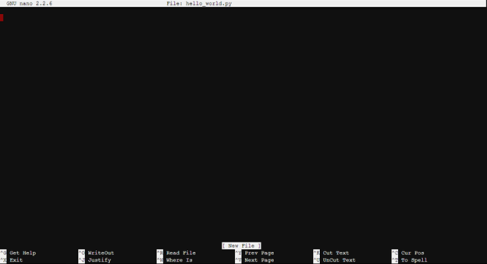
Whatever you want to code you have to write in here.

To save your code press CTRL + O and press ENTER.

To run your code first you have to close “nano” by pressing CTRL + X and then in your terminal write –

$ sudo python hello_world.py

Any Alternative?

If you find difficult like me to code in “nano”, definitely you will be looking for something better. As I also want to debug my python code but “pdb” is not so cool to do that. So what is an alternative?

Fortunately,  Adafruit came up with something called “Adafruit WebIDE”. It is web based IDE (Integrated Development Environment) which allows me to debug my code and also it has one more cool feature called visualizer which helps us understand structure of the program while running it. You can find its overview @ Adafruit Web IDE overview Link

For installing WebIDE follow instructions @ installing instructions link

Now if you have installed WebIDE its time to run it. Type “r-pi IP-Address” in your web browser it will ask for login. So press sign in to login and screen which will follow is –

Image

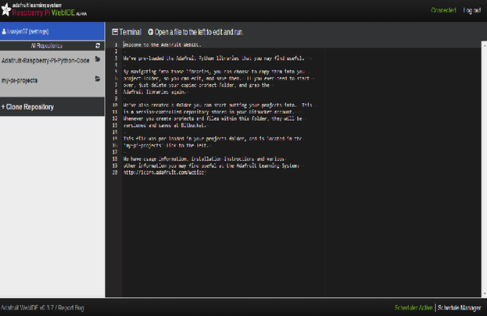
  •  In left side there is list of repositories (currently 2) –
  1. Adafruit-Raspberry-Pi-Python-Code
  2. My-pi-projects

Adafruit-Raspberry-pi-Python-Code contains some sample python programs provided by Adafruit.

My-pi-projects directory is meant to directory where you will store all your programs which you want to run, edit, debug and clone.

  • Under this section there is “Clone Repository”. Clicking on this popup will open where you can enter GIT url of your code repository on git and click “Clone Repository”.
  • On the right side at top, there is “Terminal” option to open Linux Terminal where current working directory is “/usr/share/adafruit/webide/repositories”.
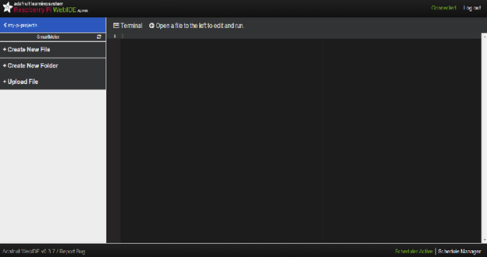
  • When you click on “my-pi-projects”, there is README.md file in this directory and just under this there is CREATE PROJECT FOLDER option to create new folder. Click on this and type desired name and press “Submit”.
  • Folder is created and you have entered it. Now you can see 3 more options :
  1. CREATE NEW FILE
  2. CREATE NEW FOLDER
  3. UPLOAD FILE (To upload file to raspberry pi from your local pc)Image
  • When you create new file, window that opens have few options on top:
  1. TERMINAL: Will open OS terminal.
  2.  RUN: Will run your written code.
  3.  DEBUG: Will help you debug written code.
  4. VISUALIZE: Will help you understand basic structure of code while running it.
  5. SAVE: Used to save code in repository.
  6. COMMIT AND PUSH: Will commit your code file in bitbucket.org repository. Image

That’s all for now. In my next post i will write more about web-ide and other ways to do programming. Till then i hope you will try above things. Feel free to ask anything related to r-pi.

Stay Connected 🙂 and don’t forget about feedback:)

Wifi and Ethernet dropout problems in raspberry pi


Hi Everyone

More work to do! But i also need to write the post i promised. So on Business!

The thing i am writing about today is what freaked me out for many days. Didn’t know what was happening to my r-pi. So that ways its very valuable post which can save lot of your time that i spent tackling these errors. Two main problems were Wi fi + Ethernet drop outs –

Wi fi drop out problem –

One problem that I came across almost first hour I started using raspberry pi was its wi fi connection drops out every now and then and didn’t reconnect automatically until I reboot r-pi or run some command to do it manually( forcing wlan to reconnect). So I wrote a script to do this automatically.

It checks every minute for wireless connection and if I find it down then force it reconnect. See below –

Image

You can also find it here.

Ethernet Driver Problem –

Other problem that freaked me out was – my raspberry pi was freezing every 3 days while running continuously and after reboot it ran 3 more days but then again similar problem. These days I was using wi fi adapter to send data over wi fi network. So I decided to reboot my r-pi every day automatically. But then over Ethernet connection this freeze was happening more frequently (as fast as 4-5 hrs). so I decided to look for this in /var/syslog.

Surprise was – r-pi was not freezing. Heard that? Its USB and other ports were freezing (stopped working). May be that Ethernet problem was hard to tackle for kernel, causing it to freeze!  And the technical reason was –

“FIQ interrupt not triggering IRQ interrupt causing USB to dropout”

This comes into play when you run r-pi for longer periods. The problem was “wrong regoffset, value” in –

/sys/devices/platform/bcm2708_usb/regoffset
/sys/devices/platform/bcm2708_usb/regvalue

The solution is in this script –

Image

You can also find it here.

It pings to check if Ethernet is up and then its down then write correct regoffset /values in corresponding files.

These two problems cost me lot of time. I hope this will not be in your case.

I am still clueless about what to write in next post. May be you can propose some of ideas. I will be happy to get them.

Till then Stay Tuned – Stay Connected 🙂  Will write soon 🙂

Don’t forget to give your comments / feedback.

Connect your raspberry pi to Wi-Fi network (Command Line)


Hi Everyone,

Was messed up with work,  so couldn’t  post last 2 days. Better late than never.  Today I am covering how to connect to wi-fi network using command line(raspberry pi). So have a look –

Step 1 – 

Leave your wi-fi adapter placed on table. No need to connect it for now and open Linux terminal by clicking on its icon.

Step 2 –

Write following command and press ENTER –

sudo nano /etc/network/interfaces

Step 3 –

Editor window will open  –

Image

Step 4 –

Change text in quotes against  ‘wpa-ssid’  option with your SSID (wi-fi network name) and text against ‘wpa-psk’ option with your wi-fi network password(security key).

Step 5 –

To save this file press CTRL+O and then press ENTER

Step 6 –

Shut down your raspberry pi, plug wi-fi adapter in USB port and Restart it. Your raspberry pi will automatically get connected to your wi-fi network.

Tomorrow i will be covering some wi-fi and ethernet issues of raspberry pi as promised in my previous post. Till then – Stay Tuned – Stay Connected 🙂

And please don’t forget to give your comments and feedback. I am quite hungry of them.